Thursday, 17 May 2012

Distracted!!

I bought a BMW R80 on Ebay last weekend. I have always wanted one after touring south africa on a BMW slash 5 about 7 years ago. The only trouble is there so bloody expensive. After being out bid on about ten bikes in the last few months, all going for stupid money, I managed to find one that looked so crap I thought surely no one would bid on it. They did bid, but not too much. I won the auction for the princely sum of £525, a bargain compared to the prices they seem to be fetching right now.


It has a cut down GPZ fairing, with home made brackets welded by a blind man. The rear seat hump is made from strips of aluminium pop riveted together. The area between the seat hump and the back light was covered in duck tape. When I was looking at the photos on Ebay I joked that the back end was made of cardboard!!


Blimey! I was right.


I was going to take the bike out for a spin as it came Tax'd and Mot'd!! But my friend Duncan would not let me, as the bike in its current state was cheapening the brand. We had to do a 60 minute make over like they do on Tv so we could redeem the brand of BMW!

It actually took 6 hours!!

First we stripped and removed the rear sub frame, grinding the brackets off that had been welded on by the blind man to hold on the hump (The hump could be entered into robot wars if I fit a hammer and some wheels to it)


We then cleaned up the sub frame (when I say we, I mean Duncan) and sprayed it with primer and then with Halfords finest black gloss.

The rocker covers were also cleaned up and painted. Fairing was removed and new brackets made for the indicators. Duncan also kindly loaned me a single seat he had made for his R80.


Brand redeemed! Now off for a ride

Once the honda is finished the BMW will be properly stripped and re-build

Tuesday, 8 May 2012

I could not find anywhere on the bike to put the original rear brake reservoir as it looked rubbish. The original is a rectangle shape with the pipe coming out at an angle and was just plain awkward to position anywhere.

I remembered I had a spare reservoir off a Yamaha R6 knocking about from when I converted my old TRX850 to R6 blue spot front brakes. This fitted perfectly and looks much better. I also fitted a braided hose on the rear and this has made a massive difference.


I needed something to plug up the rear subframe holes. I saw a BMW on Bike Exif a while ago that had used bar end weights to fill the holes left at the end of the frame, CLICK HERE

I have a pair of old blue aluminium anodised bar ends so decided to use this handy tip for removing the anodising,
CLICK HERE

Before


After

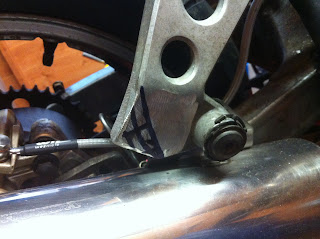
This is them fitted to the rear sub frame holes.


Now to go and find some steel!!
I spent a rainy bank holiday finishing off the exhaust hanger. I ground the corner off then filed off some of the grind marks, which took ages! I then got bored so started polishing the thing up with a hard polishing mop on a bench grinder. I used to be a polisher when I left school and forgot how dirty you get after just half an hour!! As you can see from the photo below it's not perfect as you can see some of the grind marks but it will do for me!

I then ground off the rectifier plate with the handy dremel tool. I will relocate the electrics under the seat as there should be just enough room.

The battery holder was all part of the inner mudguard so I have cut that down until I have been left with just a battery box. This will still be in its original position under the seat.


I then drilled a couple of holes in the seat so I can mount the seat to the rear subframe as there are 2 holes already pre-drilled. I have a large collection of fasteners that I made and collected over the years working in different engineering factories. The nuts holding the bolts in place are all metal lock nuts for the aerospace industry, they are guaranteed to never shake loose!!


I made a template for a steel cowl to go around the rear of the seat to neaten things up and mount the rear light too, but the piece of steel I have is an inch to small!! When I get some more steel, that will be the next job and relocating the rear brake reservoir.

Tuesday, 1 May 2012

I managed to get some time on the bike so I pulled out the swing arm and rear shock to give them a good clean. I was expecting everything to be seized solid and was pleasantly surprised that everything came apart quite easily.
The gaping hole left after it came apart too easily! No centre stand so I had to use an old scissor jack, which worked better than a centre stand!
I spent about 30 minutes with a wire brush and a dremmel to get rid of all the crud and rust off the swing arm and shock. The small pile of rust and crud on the picture below is just a fraction of what came off it!
I wasn't going to paint the swing arm as it would look too new and not in keeping with the general scruffiness of the bike and my laziness!!
I also cleaned the chain and sprockets up as they look ok to still use. I also cleaned all the old oil off the rear wheel with petrol, making sure none of it got on the tyre!

I ground off the bits of metal on the rear foot peg holder/exhaust hanger so it's now just an exhaust hanger, I kept it as I like the holes, which is something I might do to the side panels!
It's not finished yet hence all the grind marks and marker pen as I might just take the corner off so it doesn't look too square. I forgot to take a before and after shot so all I have is after!!


Sunday, 15 April 2012

Had some spare time yesterday so I stripped and rebuilt the front brake calliper as the pistons were seized.
When I took the calliper off and got an airline to force the piston out it wouldn't budge so I had to resort to vice grips with some padding so as not to damage the brake piston. Once they were out I used a Dremel with a brass brush to clean out the salty crud that was in behind the seals. A good clean with brake cleaner and a blow out with the airline cleaned them up nicely.

Before

After

I have read loads of different opinions on forums about brake seals and red grease so decided to soak the new brake seals in fresh brake fluid and apply red grease to the outside of the pistons before re-fitting. No doubt someone will tell me I should have done it differently.


I also bought some new pads and braided hoses which help beef things up a bit. When I came to bleed the brakes I found that the reservoir screws were made of cheese.


The cross heads promptly dissolved at the slightest touch so I had to resort to putting a slot in the screw heads with a flat screwdriver and a hammer! They were so soft it was quite easy. I have replaced them with stainless screws.

I went to Newark auto-jumble today and bought some steel for making something for the back of the seat and a crusty looking item for the rear light.


Thursday, 29 March 2012

Got the angle grinder out after work tonight, cut a chunk off the back end and shortened the seat.

I will be getting rid of the rear foot pegs and make an exhaust hanger

I kind of like the side panels, still not sure if I should keep them?

I need to tidy up the back of the seat and decide if I want a cafe racer hump or something else

I am going for an overall rat look to the bike, which will mean getting some heavy duty paint stripper on the petrol tank for the bare metal look! The bike has a lot rust but nothing terminal. I think its known in the trade as patina!! All the bikes I used to own were rat bikes. I'm just after a cheap'ish fun bike that looks different to the normal run of the mill shiny plastic factory bikes.
I still have to sort the brakes, fork seals and take the swing arm off for a clean, but not too clean! But thats in a couple of weeks!

Sunday, 25 March 2012

I've been playing around with photoshop(not very well I might add) and have come up with this basic style for the CB-1. The colour will be more of a dull exposed steel look, than the white that it looks in the picture. I think I am going to keep the original silver side panels, as i should be able to hide some of the wiring and the rear master cylinder behind them.


I was going to straighten the seat rails but I don't think it would look right, it looks better on twin shock rear ends than mono shock.

I will be getting the angle grinder out over easter, and cutting off the back end where the white line is.


Need to sort out what tail/seat unit to put on?


Saturday, 10 March 2012

Finally got the bike started yesterday. Super clean carbs, new spark plugs, fresh petrol and fresh battery.


It was a bit smokey to start with but the bikes been stood for 5 years!!!


Next job was to sync the carbs up. I borrowed a Carbtune from a friend. Getting the screws out to fix the hoses was a pain. I had to remove the carbs again to get to the little blighters, then buying longer screwdrivers didn't work. Out came the mole grips, this worked without to much damage to the screw heads, I didn't have to resort to the Dremel!! but got there in the end! The carbs were way out. It didn't take to long to get it right. The carbtune is an excellent bit of kit.

I then rode it down the road and back and the CB1 was running perfect, trying not to use the brakes as they seize on solid as soon as you touch the levers!

I will now start stripping down the brakes........

Sunday, 4 March 2012

I wasn't happy with the condition of the carbs and the overall greenness of the jets even after cleaning with carb cleaner. I went out and bought an ultrasonic cleaner and tried again!

You can fit 1 carb in at a time, as the tank is quite big.


The difference is amazing!


I've put the carbs back together, just need time to fit them back on again.

Tuesday, 28 February 2012

Carbs cleaned, and they certainly needed it. The picture below doesn't do it justice, the jets were filthy and gummed up and float bowl needles sticking.

All clean now, but the buggers still not starting. plugs are getting wet with fuel now, but the battery might be a bit weak and feeble. ordered new plugs and battery.


Friday, 24 February 2012

The carbs are off. gotta work the weekend so will have to wait till next week before I look inside!

Wednesday, 22 February 2012

Wont start

Theres plenty of spark but no fuel for the plugs to burn!

Off with the carbs!

Sunday, 19 February 2012

Project CB-1 to cafe racer!

This is my first blog. This will be about me trying to turn a Honda CB400 CB-1 into something a bit different than Honda intended! I will be first trying to get the thing started, then sorting the mechanicals out.
Once thats done then I will be shortening the back end into a single seat, removing as much metal as I can and giving the tank a polished bare metal look.

This is the bike when I picked it up.